Adding devices to Hama Smart Home - instructions
The Hama Home app is your central cockpit for your smart devices: add it and you have full access. Under certain circumstances, however, it can happen that setting up in standard mode (EZ mode) does not work and the Hama Home app cannot find any devices. The simplest solution is probably manual pairing mode (AP mode), which we explain step by step on this page. You can also use the table of contents to jump directly to the point where you need support.
The standard method of installation is referred to as EZ mode (Easy Mode). In this mode, specific router settings may lead to difficulties, e.g. a device may not be recognized. Access point mode (AP mode) "bypasses" these settings and establishes a direct connection between the smartphone and the Hama Home device. This does not result in any disadvantages for you: Regardless of the installation method, you can conveniently control all added devices via the home screen in the Hama Home app.
If the EZ mode did not work for you and the app displayed an error message "You are connected to a 5 GHz WLAN network", for example, you can continue directly with step 6 In this step, switch to AP mode in the app.
At a glance: Set up the Hama Home app
- Download the Hama Home app and set up an account to control smart devices conveniently and centrally
- Connect the app to the correct Wi-Fi network and add devices
- The solution if the Hama Home app cannot find any devices or cannot establish a connection
- Connect smart devices to the app in just a few steps
- Advice and help if something is not working, with problems and questions

1. Install the Hama Home app
Download the latest "Hama Home" app to your smartphone or tablet with an Android or iOS operating system. Make sure you select the correct app. Do not select the "Hama Smart Solution" app: it does not work in conjunction with our smart home products.
Click here to download the Hama Smart Home app for Android and iOS:
2. Create an account and log in
To manage your Smart Home products, you need a free customer account in the Hama Home app. You can easily set up this account directly in the app. If you already have a customer account for Hama Smart Home (not Solution!), you can also use it to log in directly.

For the app customer account, you need an e-mail address to which a six-digit verification code is sent. Verification in the Hama Home app only works by email (not by phone number, text message or call).
3. Connect Hama Smart Home with WLAN
To control the smart devices, the Hama Home app must be connected to the Wi-Fi network Practical: When adding new devices, you are automatically asked for the access data so that the app can search the correct network and find the devices. However, make sure that the Wi-Fi network is active and within range.
Most smart home products from Hama can be controlled directly via the existing Wi-Fi network in your home With Hama, you can do this easily without a gateway, i.e. conveniently and directly - and without additional devices such as hubs.
Of course, you don't need any expensive additional purchases for the Hama WLAN heating control: Here, the necessary WLAN gateway is already included in the starter kit. This allows you to quickly and easily integrate the control panel and thermostats into the Wi-Fi network via the Hama Home app.
Therefore, confirm the password for your Wi-Fi access in the Hama Home app by adding devices. This allows you to find and control the socket outlet with consumption measurement, smart power strip and all other Hama Smart Home devices directly via the app.
And this is how it works: To connect individual devices to the Hama Home app and the WLAN, first tap on "My home" in the app and then on the plus symbol or "Add device".
If your phone isn't connected to Wi-Fi, the app will prompt you to turn on Wi-Fi or check your network settings. If necessary, please make sure that the mobile phone is connected to the desired Wi-Fi network and then switch back to the Hama Home app.
You can ignore the device search via Bluetooth. To ensure a stable connection between the Hama Home app and your devices, please only use the WLAN connection.
4. Add device via select device type manually
In the overview, select the WiFi device type that you would now like to add. By selecting this, you tell the app which device type it should search for. Devices of a different type cannot be detected in this search run.

Selecting the right type of device
The selection is clear for most device types, a distinction is made primarily in the areas of heating and lighting. To set up the Hama WLAN heating control, select e.g. "Hub" for
- the smart heating control system, i.e. the central unit that can be used to control thermostats, and
- individual thermostats that you can assign to the already installed central control unit as a sub-device.
If, for example, a smart lamp is not recognized during the search run, this may be due to the selection of the device type. A distinction must be made here between
- lamps, such as the white or multicolored LED lamps.
- lights, such as a ceiling or wall light.
If you have selected the wrong device type, please try the correct selection and start the search again. The same applies to classic WiFi sockets and sockets with consumption metering.
No, compatible devices can only be added to Hama Smart Home individually. This avoids confusion, both during setup and when naming and managing the devices via the home screen.
5. Enter access data for the WLAN network
Even if your smartphone already has an active Wi-Fi connection, the app itself requires the access data for the Wi-Fi network. To do this, select the name of the desired network and enter the password (network key) manually If you have not changed the name and/or password for your Wi-Fi network, you will find this data on the sticker on the bottom or back of your router Then:
- SSID: Name of the WLAN network
- WPA2 (network key): Password for the network, 16 to 20 digits

You do not have to re-enter the access data for each individual device. From the second device onwards, the SSID and network key of your home network are already entered if you have granted the Hama Home app access.
The name of the network to which the smartphone is connected is usually already entered. The network name may not be displayed for devices with an iOS operating system if data protection settings prevent automatic transfer. Solution: Release the location for the Hama Home app under Settings > Privacy settings > Location. Then start at point 3 of these instructions to connect devices to the Hama Home app.
Depending on your smartphone's operating system, you can also enter the access data using a QR code (if available). However, it can always happen that an error message appears when entering the access data for the Internet or WLAN network This may be the reason:
- Incorrect password: There are several numerical keys on the sticker on the router (e.g. network key and device password) or the access data (WLAN password, network key and/or network name) have been changed.
- Password too long: When entering the WLAN key, a message may appear stating that the entry is too long. You can ignore this message and confirm the entered password.
- Copy & Paste: When copying and pasting the password, additional characters such as spaces are quickly copied, so that the password entry is incorrect.
- QR code: The longer the password, the more complex the QR code. With very complex images and depending on the quality of the image, a QR code can become unreadable.
Solution: Enter the Wi-Fi password manually. If the access data for your Wi-Fi network has not been changed, use the WPA2 key as the password.
Caution: Modern routers provide the Wi-Fi network on two radio frequencies by default: 2.4 GHz and 5 GHz. If the network name for the two frequencies has not been renamed individually, the smartphone is usually unable to distinguish between them. Therefore, the app may now display the following message:
You are connected to a 5 GHz WLAN network. Switch to a 2.4 GHz WLAN network and continue.
At this point, select "Continue with current network".

6. Resetting / pairing the device
Next, the app will ask you to reset the device you want to add. In this view, you will see "EZ Mode" at the top right of the app. Tap on it and then select AP mode. This switches the app.
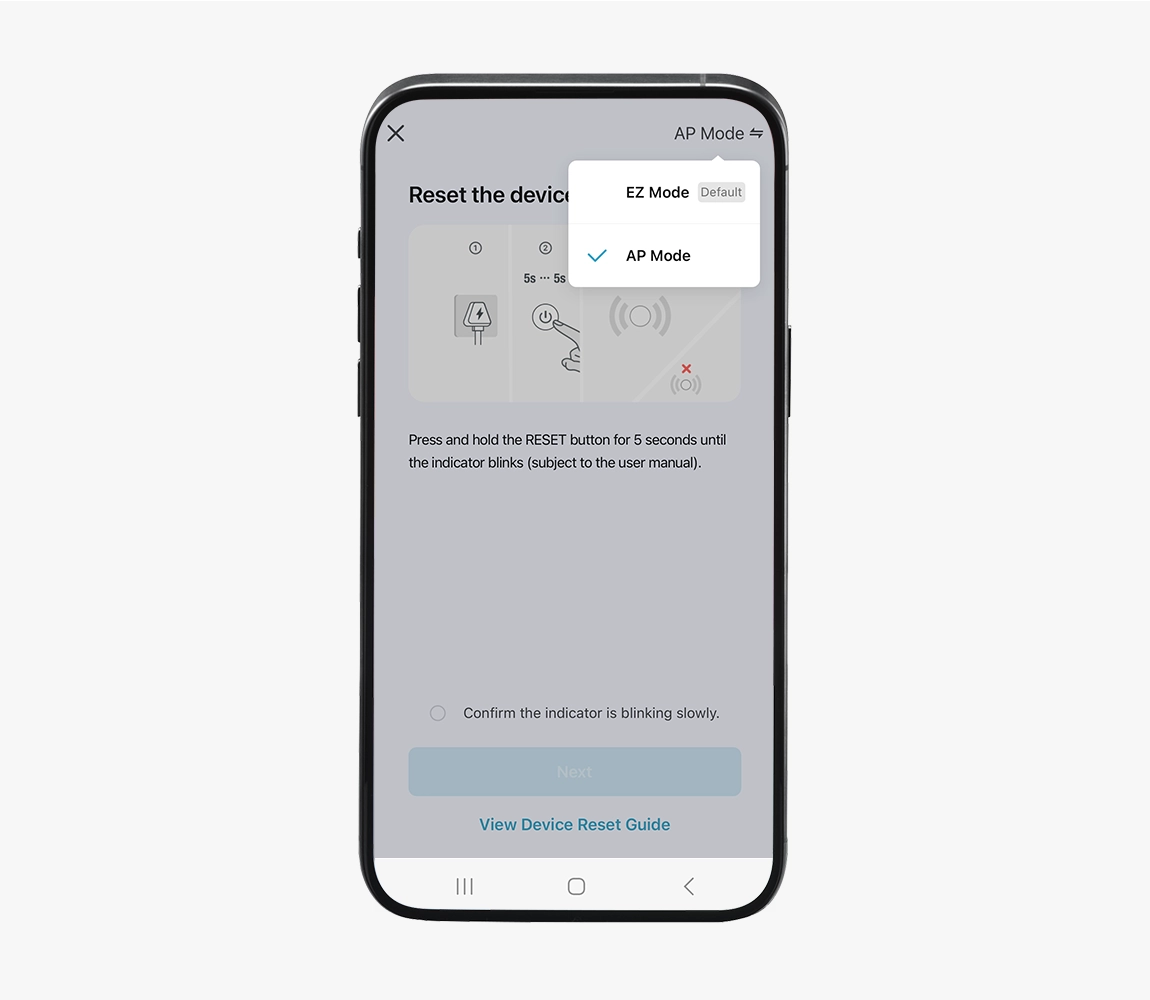
Now turn to the device you want to add and switch from EZ to AP mode here too. The procedure for pairing is basically the same, but must be repeated. Don't worry: these instructions will guide you through every single step.
Activate pairing mode
The following applies to most devices:
- Press the pairing button for several seconds.
- The LED now flashes quickly.
- Release the button again.
If it is a light source (luminaire or lamp), use the light switch. Switch the smart lamp or light at intervals of approx. 1 second:
- On
- Off
- On
- Off
- On
The smart lamp or light now flashes quickly.
If there is no rapid flashing, please try again. With lights or lamps, the speed of switching is crucial. Solution: When trying again, please leave longer or shorter pauses between switching.
Please follow the instructions on the smartphone and the sequence of the light signals in the operating instructions, depending on the device.
Set the device to AP mode
To activate AP mode on the device, press and hold the pairing button a few times for several seconds or repeat the on/off sequence for lamps and lights. Don't worry: the app and these instructions will guide you step by step.
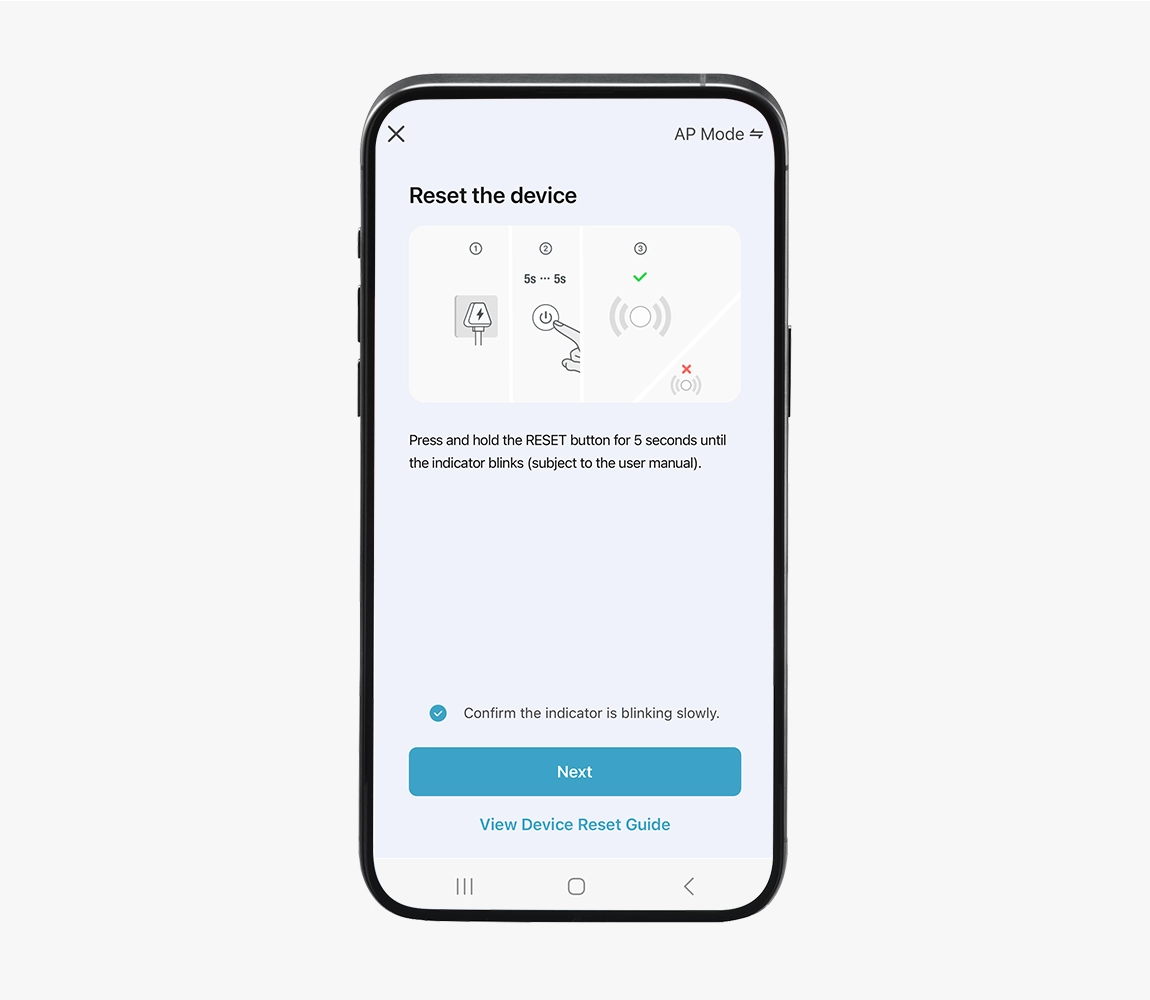
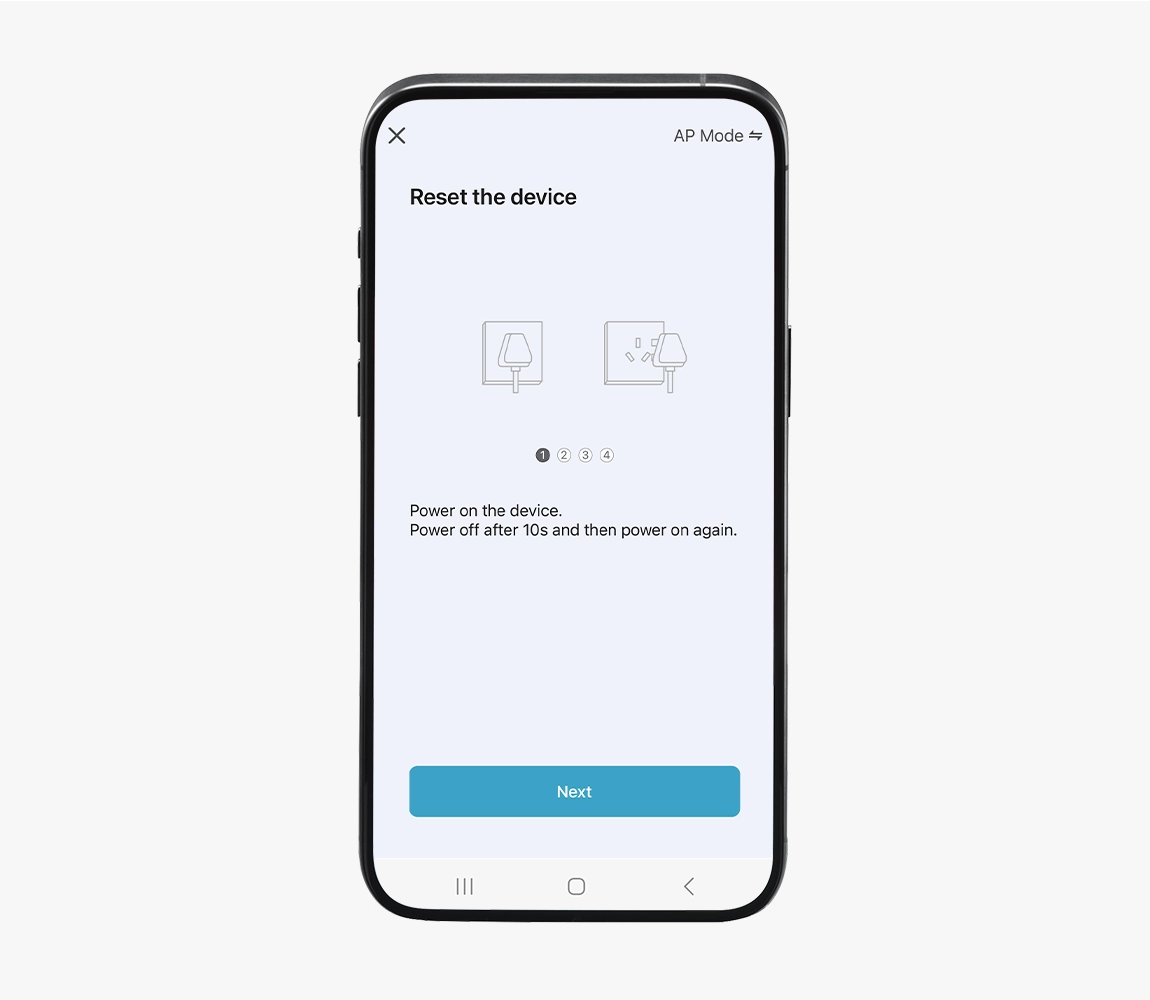
1. Switch the device off or disconnect it from the power supply. After about 10 seconds, you can switch it on again or plug the cable back in. The LED will now flash slowly. Then tap on "Next" in the app.
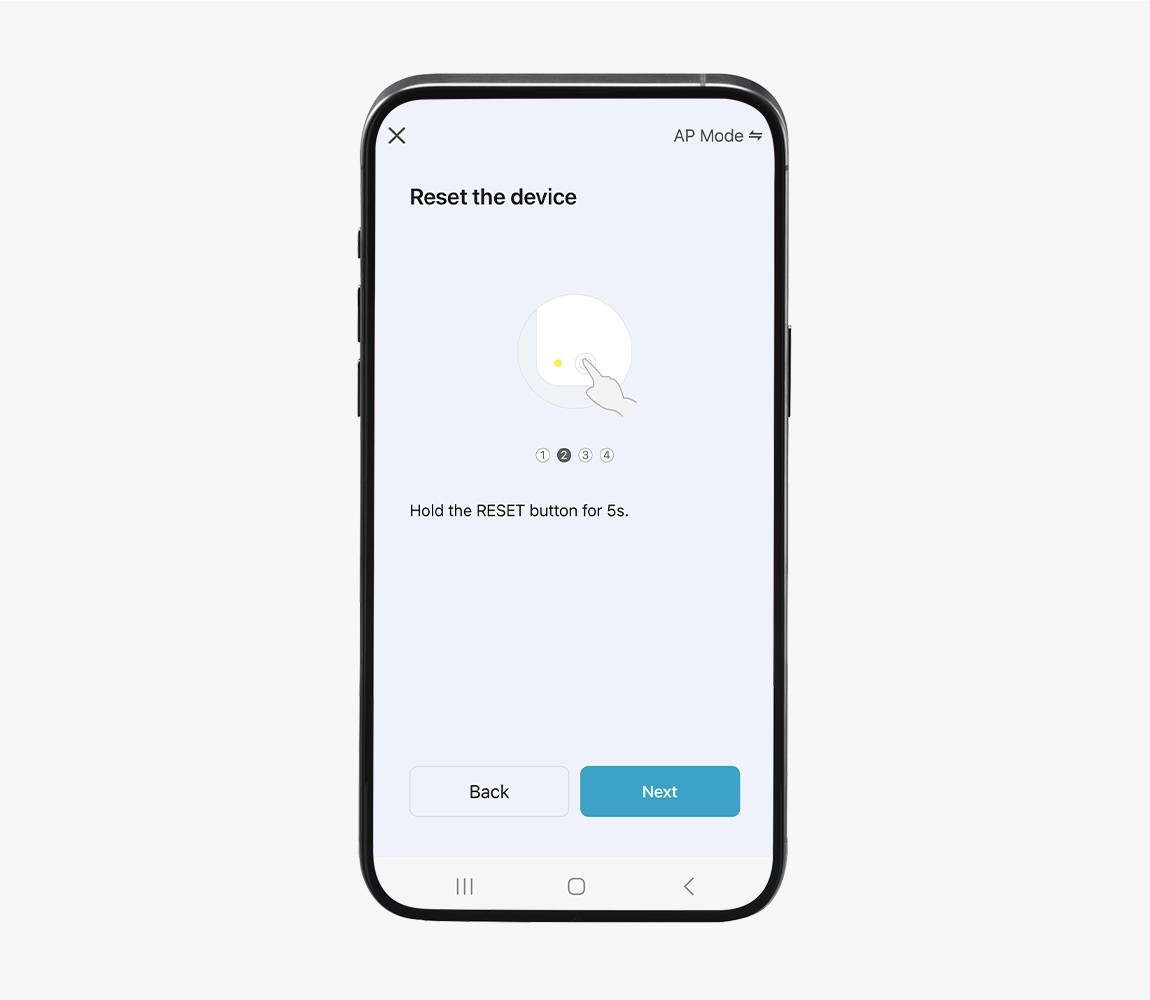
2. Now press and hold the pairing or reset button again for a few seconds until both LEDs go out. Confirm the step in the app again with "Next".
3. Shortly afterwards, the red LED flashes quickly. As soon as it flashes, confirm the display in the app with "Next".
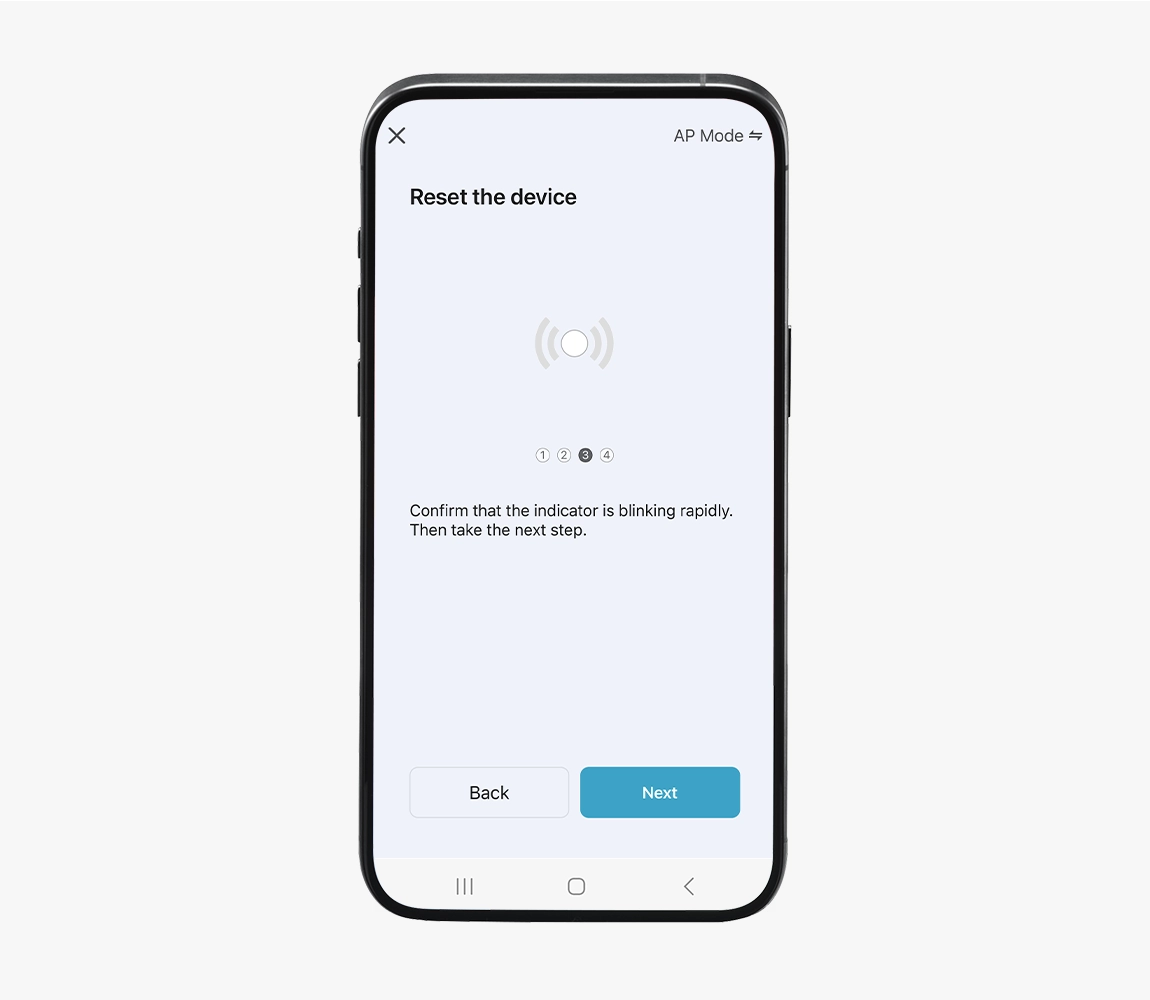
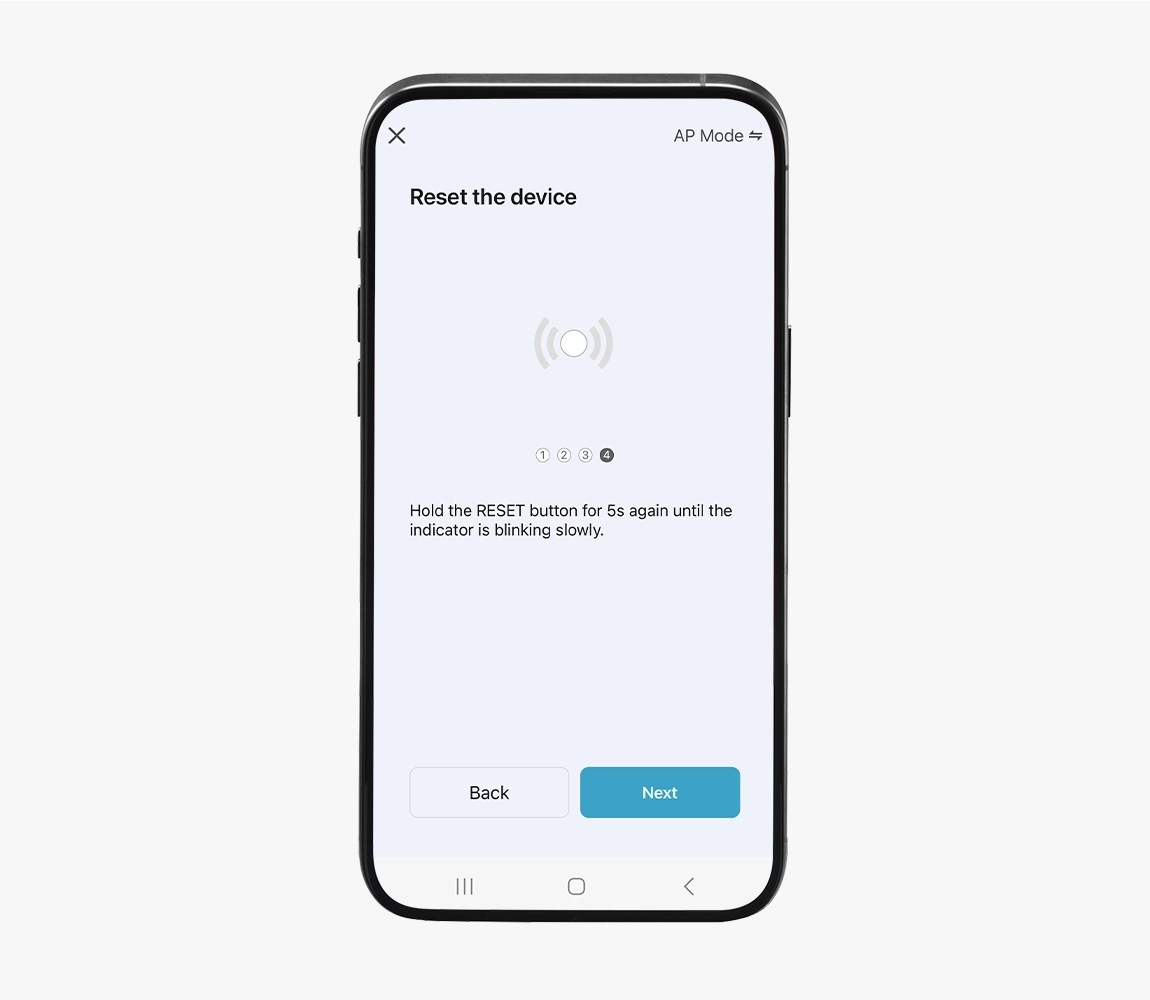
4. Now press and hold the reset button one last time for approx. 5 seconds so that the LEDs go out again briefly and then flash slowly. Confirm the step again in the app with "Next".
7. Connect to the device
Then switch to the WiFi settings on your smartphone The device is now available here as a new network or WiFi hotspot You can recognize it by the designation with SmartLife in the name, e.g. "SmartLife 4814". Select this to establish the connection to the device.

If the SmartLife network is not yet visible or not yet listed in the Wi-Fi networks, refresh the view in the menu window with the network overview with the typical finger swipe downwards. If necessary, activate pairing again using step 6 above and wait a few seconds.
As soon as your smartphone has connected to the SmartLife network, a push notification may appear outside the app stating that an internet connection is not available. Please ignore this message. When asked whether you would like to connect to the SmartLife network once or always, both options work, the specification makes no difference when setting up in the app.
8. Add device to the app
When the connection between the smartphone and the SmartLife network is established, switch back to the Hama Home app.
The quickest way to change the app depends on the operating system:
- Android smartphones: left-facing arrow symbol ◀ (back button) at the bottom corner next to the home button
- iOS / Apple iPhones: use the app switcher to activate the Hama Home app in the foreground or tap on the “Hama Smart Home” or "Hama Home" display at the top left.
In the next step, a hotspot message may appear in the app, which you can now confirm. The two-minute search will then start. This establishes a direct connection between the Wi-Fi router and the Smart Home device. You can now rename the device in the Smart Home app, e.g. by room, function, etc. Then tap "Done" in the top right-hand corner to complete the setup. The new device now appears with its own icon in the app on the home screen.